In the previous article we analyzed the fundamental concepts related to mixing. We looked at how to approach a mix from the very beginning, offered some advice on how to make the mixing process less overwhelming, and discussed how to develop your own mixing philosophy. Now we'll begin analyzing the different technical processes involved in a musical mix.
Before diving into the analysis of these technical processes, it's important to highlight a few essential points. First, we must always keep in mind that the technical processes we'll discuss must be at the service of the music. This means we shouldn't apply equalization, compression, reverb, etc., randomly — we must understand why we are making a particular modification to a given track. For example, we shouldn’t apply compression to a kick drum automatically. Sometimes a kick will require a faster attack, a higher ratio, or something completely different. Just because a compressor setting worked well on the kick drum in one song doesn’t mean it's going to work again in another, even if both tracks belong to the same production. Every time we apply compression to a kick, we must clearly understand what we're trying to achieve — something that comes with experience — yet it's undeniable that we first need to know the techniques that allow us to accomplish what we have in mind.
It’s also important to note that although in this article we’ll study technical processes in separate sections, we must keep them all in mind simultaneously while mixing. Even if experience leads us toward a personal workflow or order of operations, it’s a mistake to think in terms of “first EQ everything, then compress everything…” All processes must be applied fluidly, not as isolated steps.
In this article we'll focus on two essential tools that greatly determine whether we achieve a good mix. We'll look at the types of equalizers we typically encounter during mixing and analyze the behavior of dynamics processors.
Introduction to Equalization
Equalization allows us to modify the frequency balance of a signal. We use EQ to boost certain important frequencies or attenuate others so that all tracks sit properly together in the mix. As mentioned in the first part of this series, it’s a mistake to aim for a “perfect sound” on an individual track, because what really matters is how that track sounds within the entire context of the mix. Don’t worry if you find the perfect EQ for a guitar within the mix but discover that, when soloed, it sounds horrible. You should not judge elements in isolation, but rather by how they contribute to the whole.
We must also consider the phenomenon known as “masking.” This psychoacoustic effect shows that certain sounds can hide others of different frequencies. Imagine a distorted electric guitar with rich harmonic content, and imagine a vocal playing simultaneously. If we craft an amazing guitar sound without considering the vocal, once both are played together, the vocal may be unclear. That’s a classic case of masking. In such situations, we must first find a good EQ setting for the vocal and then bring in the guitar, attenuating problematic frequencies to create room for the voice.
Types of Equalizers Used in Mixing
Mixing typically involves only a few types of equalizers, so we won't analyze every existing model. Regardless of whether the EQ is hardware or software, or which company manufactures it, once we understand how these common types work, we’ll be able to use any of them intuitively without resorting to manuals — even though each will have its quirks, they all behave in very similar ways.
First we have parametric equalizers. These offer three essential controls. One control sets the center frequency where the boost or cut will occur. Another is the quality factor (Q), which determines how narrow or wide the affected frequency range will be around the center frequency. Therefore, when using parametric EQs we must work with the center frequency, the Q factor, and the gain. Keep in mind that the higher the Q value, the narrower the bandwidth affected by the gain — meaning narrow-Q settings are ideal for fine adjustments, whereas low-Q settings (around 0.6 or 0.7) are more suitable when adjusting broader frequency ranges.
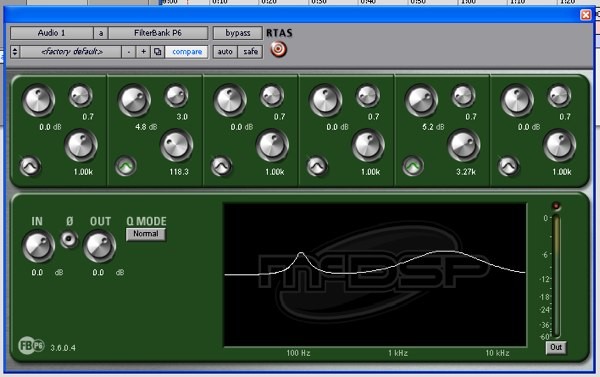
MCDSP’s P6 parametric equalizer. In the configuration shown, two bands are active: one centered at 118.3Hz with a 4.8dB boost and a narrow bandwidth (Q=3), and another centered at 3.27kHz with a 5.2dB boost and a wider bandwidth (Q=0.7).
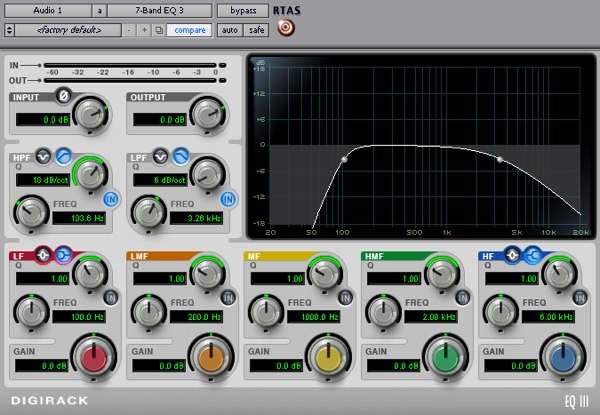
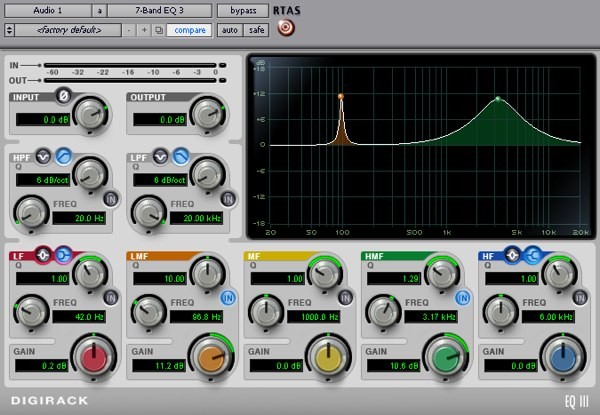 Another example of a parametric EQ. In this case we have Digidesign’s free 7-band equalizer with two active bands.
Another very common type of EQ used in mixing is the shelving equalizer. In a shelving EQ we select a frequency from which all content above (high shelf) or below (low shelf) will be boosted or cut. Some models also allow control over how steep or gentle the slope of the shelf is.
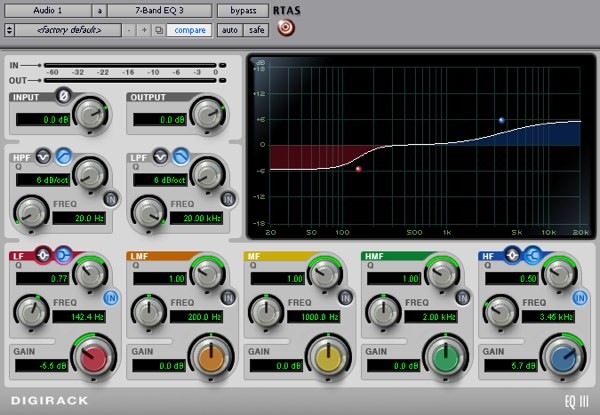 Here we have Digidesign’s EQ3 configured with both low and high shelving filters. In the low-shelf case we have a cut set at 142.4Hz, while the high shelf boosts frequencies above the selected 3.45kHz point.
Finally, filters are widely used in mixing. Filters typically provide a cutoff frequency control, and in some models we can also choose the slope. High-pass filters remove all frequencies below the cutoff, while low-pass filters remove those above it.
 Another EQ3 example, this time showing both a high-pass and a low-pass filter. Notice the high-pass filter has a steeper slope (18dB/oct) than the low-pass (6dB/oct).
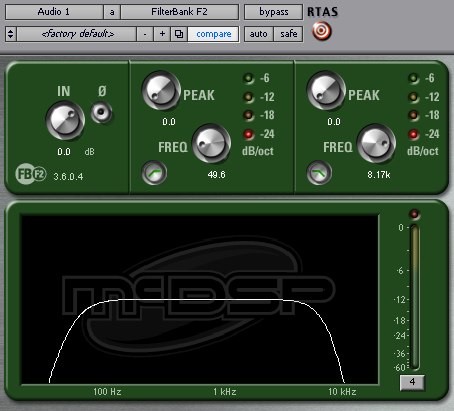 Another filter example, this time using MCDSP’s F2 with both high-pass and low-pass filters engaged.
The type of equalizer that gives us the greatest freedom is undoubtedly the parametric equalizer. On one hand, by using a very high Q we can perform “surgical” equalization that allows us to remove problems at very specific frequencies. Imagine we have a snare drum with an unpleasant metallic resonance at a particular frequency. With a very high Q we can remove that harmonic without noticeably affecting the rest of the snare’s frequencies. On the other hand, the parametric EQ allows us to make broader corrections across a wider frequency range. For example, if we have the distorted guitar and the vocal from earlier and we’re still struggling with masking that prevents the vocal from cutting through, we can use a low Q to attenuate in the guitar the frequencies where vocal intelligibility resides (around 3–4 kHz). One might think we could simply boost those vocal frequencies using another parametric band with a low Q, but remember: it is always less harmful to the sound to use EQ cuts than boosts. Whenever possible, we should opt to attenuate rather than to boost frequencies that we don’t truly need to enhance.
Shelving equalizers can be useful when we want to boost or attenuate low or high frequencies in a track without removing them entirely. For example, in a distorted guitar track in a punk production, using a shelving EQ to attenuate the low-frequency energy — without removing it completely as we would with a high-pass filter — can help achieve the “sharp” guitar sound characteristic of this genre.
Filters are used in mixing primarily to eliminate unwanted noise (fan noise, low-frequency rumble, interference at very low frequencies, etc.). Filters also help remove frequency content that belongs to an instrument but does not contribute positively to its role within the mix. For example, we can remove low-frequency rumble from a shaker track using a high-pass filter, leaving only the part of the sound that actually matters for the instrument.
With these three types of EQ, we can accomplish nearly anything we might need during mixing. If you analyze the equalizers you typically use, you’ll notice that they are all built upon the basic types we’ve just described.
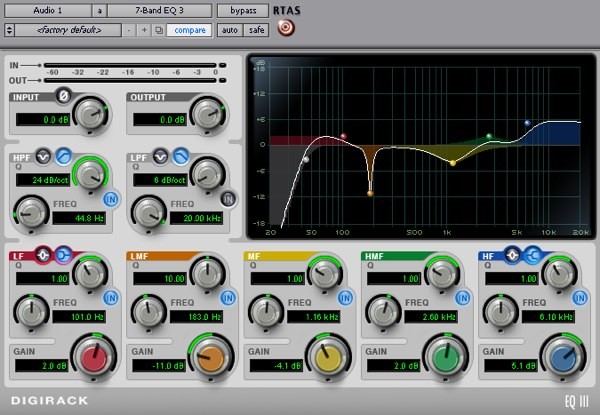 Digidesign’s EQ3, configured with a combination of all filter types.
Dynamics Processors
Dynamics processors are essential tools for achieving a good mix. There are many types of dynamics processors (noise gates, compressors, upward expanders, downward expanders, duckers, limiters, de-essers...). However, they all share a common purpose: modifying the amplitude of the signal over time, and they all operate based on the same fundamental principle, even though each type has its own peculiarities.
The basic operation of a dynamics processor is shown in the diagram below. The incoming audio signal is split into two paths. One is the audio signal itself, which will be processed, and the other is a control or detection signal (called the “key” in English). These two signals follow different paths. The audio signal is sent to an amplifier that is controlled by the detector circuit. This circuit compares the settings we have made on the processor (which we will discuss later and which depend on the processor type) with what is happening in the detection signal, producing different amounts of gain reduction at the amplifier. Therefore, the output of the processor depends both on the input audio signal and on the settings we’ve configured.
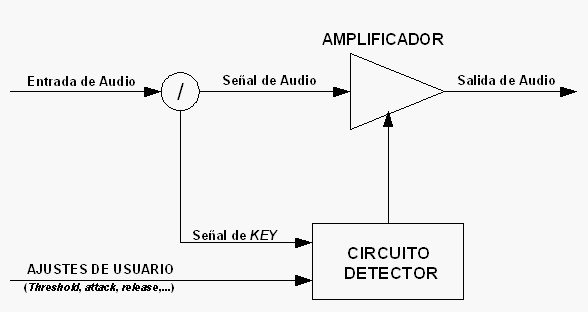 Basic operation of a dynamics processor
As we will see in later articles, this diagram may become more complex when we use a detection or key signal different from the input audio signal. This technique, called sidechain, can be extremely useful.
To keep our explanation of dynamics processors simple, let's assume for now that we’re not using sidechain — meaning the detection signal is identical to the audio signal entering the processor. Every dynamics processor includes a control known as threshold. This control allows us to set a level at which the processor begins modifying the audio signal, depending on how the audio's instantaneous level compares to the threshold. We can group dynamics processors into two broad categories based on how they behave relative to this threshold. On one hand, we have processors that act when the audio signal exceeds the threshold. This group includes compressors, de-essers, limiters, upward expanders, and duckers. In these devices, when the signal remains below the threshold, the processor does nothing — the signal passes unchanged. On the other hand, we have processors that act as long as the signal remains below the threshold. This group includes noise gates and downward expanders. These processors remain active while the signal is below the threshold and stop acting as soon as the signal surpasses it.
Before giving any advice on how to apply dynamics processors in a mix, we must analyze the most commonly used ones and fully understand how they work and what roles they can serve. Below we will look at several of the most widely used dynamics processors in mixing.
Noise Gates
These processors allow the audio signal to pass unchanged as long as the signal level remains above the threshold. When the signal drops below that threshold, the gate reduces its level according to the specified settings.
A noise gate typically includes the following controls:
- Threshold (Threshold): Sets the level, measured in dB, below which the signal will be attenuated.
- Attack time (Attack): Specifies how long the gate takes to return to unity gain once the signal rises above the threshold — essentially, how long it takes to reopen.
- Hold time (Hold): Determines a fixed duration during which the gate will remain at unity gain after the signal has dropped below the threshold.
- Release time (Release): Defines how long it takes for the gate to transition from unity gain to the full amount of attenuation once the signal stays below the threshold.
- Attenuation: Specifies how many dB of reduction will be applied when the audio level is below the threshold.
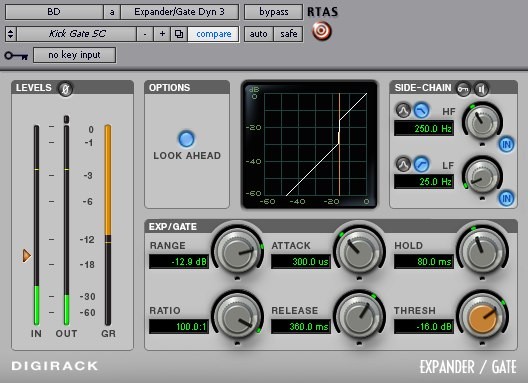 Example of a noise gate: the free Dynamics III plugin from Digidesign.
If you’re not used to these parameters, don’t worry if you haven’t fully understood them yet. To make things clearer, let’s follow the signals and the state of the noise gate in a hypothetical case. Take another look at the Dynamics III noise gate from Digidesign in the figure above. Imagine we’ve inserted this plugin on a kick drum track that has snare bleed. With the gate settings shown, the following would happen. When the audio level is higher than -16 dB, the gate is open; that is, the audio signal passes through exactly as it enters. Now imagine that at that moment the signal drops below -16 dB, which is when attenuation begins. The time it will take the gate to reach the 12'9 dB of attenuation we’ve set (in this case with the control called Range) is 360 milliseconds. After those 360 milliseconds, we will have the full 12'9 dB attenuation. If at that moment, when we’ve already reached the set attenuation, the kick hits again with a level higher than -16 dB, the gate will take 288'5 microseconds to open fully. With the hold control (in this case called Hold) we can ensure that the gate stays open for at least 80 milliseconds once the threshold has been exceeded. Hold is very useful when we have very short transients.
The best way to learn how a gate works is to load some track (for example, a kick, a snare, or a vocal track with noise) and experiment with how the gate behaves as you change its different controls.
Keep in mind that the level meters found on noise gates, whether hardware or software, are very useful when configuring a gate, as they allow us to determine the optimal threshold and attenuation levels, and they let us see how fast the gate is reacting according to the time settings we’ve chosen.
In the next part of this article, we’ll analyze the sidechain options and how we can configure the gate according to the frequency content of the key signal, as well as give some practical tips on using noise gates. Until then, try to gain a deep understanding of all the gate parameters you can tweak.
Compressors
Compressors, together with noise gates, are the most widely used dynamics processors in a mix, because they keep the signal’s dynamics under control, helping the overall mix to sound balanced and controlled at all times.
Unlike noise gates, a compressor remains inactive as long as the signal stays below the threshold. When the signal exceeds the threshold level, the compressor reduces the signal’s level. In other words, a compressor “squeezes” the signal, bringing the loud parts and the soft parts closer together.
A very typical use of a compressor in a mix is inserting one on the lead vocal track. Keep in mind that it’s impossible for a singer to perform every syllable at the same level. These variations in level are caused by pitch, pronunciation, whether a word ends in a consonant, an open vowel, a closed vowel, etc. With a compressor inserted on the vocal track, we can artificially even out the vocal dynamics, keeping level variations within an acceptable range so that no words get lost and no phrases jump “out of the mix.”
The basic controls of a compressor are the following:
- Threshold level (Threshold): Sets the level, measured in dB, above which the signal will be attenuated.
- Attack time (Attack): Determines how long the compressor takes to begin attenuating once the signal has exceeded the threshold. This is a very important parameter, because it has a big impact on the character of the sound. For example, if we use a very fast attack time, we’ll remove the transient character of the track; if we do that on a kick, we’ll lose a lot of punch.
- Release time (Release): Determines how long the compressor takes to stop acting once the signal drops back below the threshold. This control also plays a major role in shaping the sound’s character.
- Ratio: Determines how much attenuation the compressor will apply. Measuring this attenuation is a bit more complex than in the case where we set a fixed attenuation (as we did with noise gates). That’s because gain reduction is now dynamic and depends on the input signal level: the higher the input level, the greater the attenuation.
- Gain (Makeup): Compression implies a reduction in the overall signal level. Compressors usually have a control to compensate for this loss of gain.
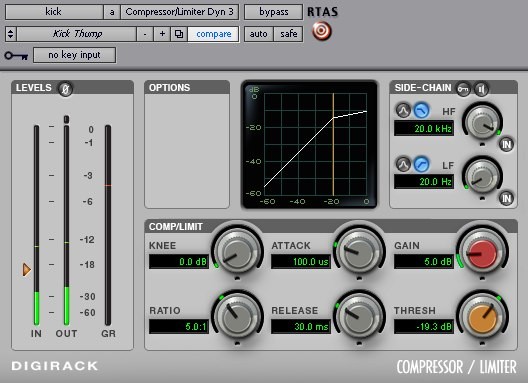
Example of a compressor using the free Dynamics III plugin from Digidesign.
Let’s take the Dynamics III compressor from Digidesign in the figure above and briefly analyze how it works, just as we did with the noise gate. When the signal does not exceed -19'3 dB, the compressor does nothing, so the signal passes through as if it were bypassed. As soon as the signal crosses the threshold, the compressor takes 100 microseconds to start acting. Since we have a ratio of 5:1, a 5 dB increase at the input will only produce a 1 dB increase at the output. For example, if we have an input signal at -14'3 dB and a threshold at -19'3 dB, we’ll get 4 dB of gain reduction, resulting in an output level of -18'3 dB instead of the -14'3 dB we would have without the compressor. Once the signal falls back below the threshold, the compressor will take 30 milliseconds to return to its idle state.
As you can see from the paragraph above, the analytical behavior of a compressor can be quite complex. However, using a compressor can feel very intuitive as long as we understand how the attack and release times and the ratio affect the sound. When you’re actually applying compression, don’t waste time calculating the exact amount of gain reduction you’ll get with each ratio. Instead, trust your ears and the compressor’s meters. In the next article, we’ll look at some guidelines for using compressors, but until then, as we’ve said… experiment with compressing tracks and analyze the results you get when you tweak all the parameters at your disposal.
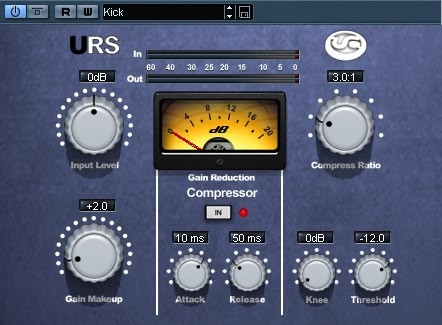 Example of a compressor using the URS 1975 plugin.
So, in this part of the article we’ve looked at the different types of equalizers we’ll be using in a mix and the two most important dynamics processors. In the next one we’ll study how to use all of this in a real mix and we’ll cover other dynamics processors based on gates and compressors. Until then, try to internalize everything we’ve covered by testing it on some of your own tracks.
Author: José A. Medina (2008)