In the previous installment we saw that any EQ move should always be guided by a clear goal—knowing exactly what we want to achieve with the result. Something similar happens when we modify the dynamics of a signal. In this article, we’ll look at the different tools we have for shaping the dynamics of individual tracks as well as groups of tracks, and we’ll also provide a practical starting guide to help you set up these processors correctly. We’ll also analyze one of the most controversial topics among mixing engineers—a topic that still causes friction between mixing and mastering engineers.
We’re talking about the use of a stereo compressor on the mix bus. In addition, we’ll examine the differences between devices such as expanders and gates. We’ll also see how overcompression in the mix can make the music sound flat and dark, and we’ll take a look at the most common mistakes made when compressing during a mix.
What does “dynamics” mean?
Colloquially, when we say that someone is “dynamic”, we mean that the person is full of energy. However, in audio, when we say something is dynamic, we’re referring to the fact that it changes a lot. To use an analogy: if we switch from the everyday meaning to the audio-engineering meaning and say that a person is very dynamic, we would really be saying that this person is very changeable. For example, in audio terms, someone with bipolar disorder would be an extremely dynamic person, since they can go from a state of euphoria to one of total depression (I’m no psychology expert, just to be clear). On the other hand, a hyperactive person, in “audio language”, would be someone with no dynamics at all, because they are always “up”, which is the opposite of what we might say in everyday speech, where we would probably describe them as a dynamic person.
So, in audio, something “dynamic” suggests that it is subject to change. For example, if we describe a symphonic piece as being dynamically rich in terms of frequency, we mean that the main instruments are changing constantly. This causes the spectral content of the piece to shift over time. Therefore, when we talk about anything related to sound, we must remember that dynamics refer to things in motion, not to static elements.
I make this distinction because misunderstandings often arise. Not long ago, while talking to a friend about a singer, he told me that she was very dynamic, which to me was inaccurate, because all she did was belt at full volume in every section of the song. To me, there was nothing dynamic about that. Now we can see that we were both saying something “true”, but using a different internal “language chip”.
Normally, when we talk about dynamics—unless otherwise specified—we’re referring to levels, that is, to decibels. More specifically, when we talk about modifying the dynamics of a signal with dynamics processors, what we’re actually doing is modifying the signal’s amplitude envelope.
The dynamics of a signal—that is, its amplitude envelope—can be broken down into three basic stages:
- Attack (attack): Characterized by a very abrupt rise in level up to the signal’s peak. It usually happens in a very short time.
- Sustain (sustain): A period during which the signal settles into a more or less steady state and maintains an almost constant level for some time, the duration of which depends on the source.
- Decay (decay): During the decay phase, the signal loses level. The decay curve also depends on the source—the shorter the time it takes for the sound to disappear, the steeper the curve.
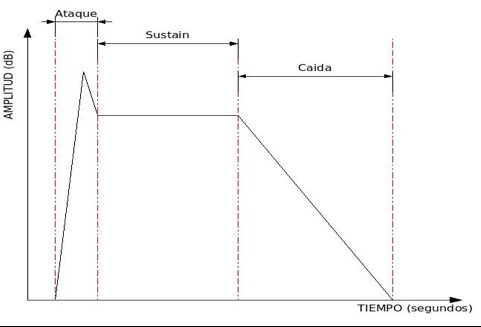 Representation of a signal’s dynamics (amplitude envelope)
We must remember that an audio signal is nothing more than an electrical representation of a sound, so its dynamics will mirror the characteristics of the source that produced it. This makes it quite easy to imagine what a signal’s dynamics look like just by thinking about the sound of the instrument that generated it. For example, the dynamics of a crash cymbal and a conga are very different. A conga has a very fast attack and very short sustain and decay, whereas a crash has a relatively slow attack and a long sustain and decay. That is what we truly mean by the “dynamics” of a signal. Above all, our ears will give us a very accurate idea of how to reshape those dynamics so that we can take the sound where we want it. In fact, when we are mixing and shaping dynamics, we rarely have any graphical representation of the envelope itself—only a few level indicators on our processors that show what we’re doing (input level, output level, and gain reduction).
It’s crucial to become familiar with the dynamics of different instruments so that we know how to modify them in order to sculpt the sound to our liking.
For example, imagine we have a kick drum in a rock ballad, and the kick track we’ve been given has more attack than we’d like for the mood of the song. In that case, we should modify the dynamics by reducing some of the attack and perhaps enhancing the decay slightly so that the kick has more “body”. That’s exactly what this article series is about: the different techniques we have to reshape dynamics. It’s essential to really understand what we’re dealing with before diving in. I’ve seen countless people—some of them professionals—apply compression or expansion without truly knowing what they’re doing. Many people rely only on whether something “sounds good” or “sounds bad”, and sometimes they get it right, but many other times they don’t. A solid understanding of what we’re doing will always save us a lot of time and will massively improve the quality of our mixes, because we’ll be in control of the processes instead of letting the processes control us.
When we talk about dynamic range, we’re referring to the difference between two levels. For example, if we say that a signal has a dynamic range of 30 dB, we mean that the distance (difference) between its minimum and maximum levels is 30 dB.
Gating: Cleaning and Shaping Dynamics (I)
One of the simplest dynamics processes—yet one that is often not given the attention it deserves—involves removing parts of a signal we don’t want or reinforcing the parts we do want. This process becomes extremely important in modern genres (rock, pop, metal…) and is barely used in genres such as classical or jazz. Keep in mind that most modern productions rely on close-miking techniques during recording. Whenever we have multiple microphones capturing several elements simultaneously, each mic will inevitably pick up unwanted sounds from other sources. In addition, the sound of modern music productions tends to favor mixes where every element is clearly audible (even when well blended) and “up front” in the stereo field. This means each element must be treated almost as an isolated source, with minimal contamination from others.
However, in genres such as jazz—where close-miking techniques may still be used—the need to isolate elements is far lower. In fact, some jazz albums mixed by inexperienced engineers (usually coming from rock/pop backgrounds) suffer from severe problems due to poor use of gates and expanders. A typical jazz mix aims to give the listener the illusion that the musicians are performing live in their living room, focusing much more on the overall ensemble sound than on extreme isolation. In a pop/rock production, by contrast, if you listen to the final record and then imagine how that would sound in the band’s rehearsal room, you quickly realize the two have very little in common. This is something we must keep in mind: although gating and expansion to remove noise or isolate instruments are simple to apply and understand, we must decide how far we are willing to take the process. Overprocessing will make the result sound unnatural; underprocessing will leave elements insufficiently isolated, resulting in a blurry and poorly defined mix.
To perform this kind of dynamic processing, we have three tools: noise gates, downward expanders, and offline editing in our DAW. We already discussed the basics and the most common controls of noise gates in part two of this article series, where we introduced dynamic processors. I recommend revisiting that section before continuing.
To summarize briefly: a noise gate removes any sound whose level does not exceed the threshold, and lets through—untouched—any sound above the threshold. This 100% gating behavior (either the signal passes entirely or is completely muted) is very drastic and can sound unnatural depending on the source. I personally only use this strict gating on snares and kick drums in highly percussive genres such as rock or metal—and even then, not always. Moreover, gating might work well in certain sections of a song but sound extremely obvious and unnatural in others. For example, if the drummer plays soft ghost notes or grace notes on the snare between louder hits, a hard gate set to only open on strong hits will simply cut out all those subtleties (usually upsetting the drummer!).
In both cases—sections with lower intensity and softer articulations—automation of the gate becomes necessary.
Most noise gates include an EQ section for shaping the key signal feeding the detector (review the basic operation of a dynamics processor in part two).
EQ section applied to the gate’s key signal
This EQ typically consists of a high-pass filter and a low-pass filter. Being able to EQ the signal that triggers the gate allows us to isolate the sound of the element we want to open the gate. Imagine we decide to gate a snare track that contains a strong amount of bleed from the kick drum. Suppose loud snare hits usually arrive at about –3 dBFS, while loud kick hits in that same snare mic arrive around –6 dBFS. That gives us only a 3 dB dynamic window to work with—far too narrow. Snare hits vary (some may be –2 dBFS, others –7 dBFS), meaning a strong kick hit might open the gate, and if we raise the threshold to avoid that, some snare hits may fail to open it.
By EQing the key signal, we can widen the effective dynamic range. Anyone with minimally trained ears knows the kick drum’s energy is concentrated mostly in the low frequencies. So, if we remove low frequencies from the key signal, the kick’s level reaching the gate detector drops dramatically. You can test this easily: solo the snare track, insert any EQ with a high-pass filter and then a level meter after it. Loop a section of the song. Activate the high-pass filter at about 30 Hz, then gradually raise the cutoff. You’ll see the kick’s contribution to the meter decrease significantly while the snare’s level remains almost unchanged—up to a certain cutoff frequency. When the snare level begins to drop, stop. That is roughly where you would set the high-pass filter in the gate’s key signal.
Don’t worry—you don’t need to do this experiment every time. It’s simply to help you understand how key-signal EQ affects gate operation. In practice, you only need to ensure the dynamic range is wide enough for the gate to behave reliably. Most gates that include key-EQ also provide a switch to monitor the key signal directly, making adjustments much easier.
It’s very important to note that EQ applied to the key signal does not affect the audio signal that comes out of the gate. It only affects the detector. The output remains un-EQ’d.
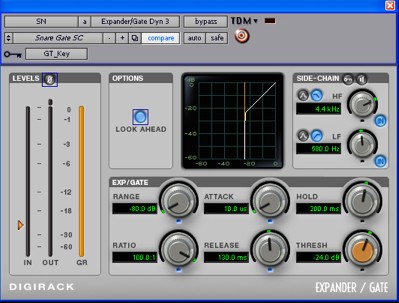 Noise gate configured for a snare. Key-signal filtering shown in the top-right.
Regarding attack, hold, and release times, there are no fixed rules. They depend heavily on the genre, the specific song, how the recording was done, the acoustics of the room, the instrument itself, and the drummer’s technique. Using the snare and kick again as an example, we can get an idea of how to adjust them.
Imagine we are gating a kick drum in a power metal track (a genre known for extremely fast double-kick passages). Suppose the drummer did not record with two separate kick drums but with a double-pedal on a single drum (which, in my opinion, is a serious mistake, though 90% of recordings are done this way). In the verses, the kick may have single, well-spaced hits with strong attack, while the choruses and bridges may feature extremely fast double-kick patterns with lower attack and slightly lower level. These sections require different gate settings. We have two options:
- If we have plenty of processing resources (DSP cards like Powercore, UAD-1, Duende, Pro Tools HD, etc.), we can duplicate the kick track and delete the unwanted sections from each copy—keeping single-kick parts on one track and double-kick parts on the other—then process each one separately. Later, if we don’t want to use separate EQs, compressors, etc. for each, we can route both tracks to a single bus for shared processing.
- Alternatively—and this is what I always do, even with ample processing resources—we can automate the gate. I don’t like mixes that feel flat or static. A mix should feel alive, and this requires many automation moves, including automation of plugin parameters. Each section of a song (except in genres like jazz or classical) often needs its own dynamic character. The ambience a chorus needs may be very different from that of a verse.
Thus, gating is simple in theory but requires careful decision-making in practice. Taste, genre, and musical intention dictate how far to take it.
Setting the gate for the simple kick sections will be much easier than for the double-kick parts. We’ll have much more time between hits, which makes shaping the kick’s tail quite straightforward. In a genre like metal, we typically want a very powerful kick with as little influence as possible from the resonance that remains after the beater hits the head. However, we can’t remove that resonance completely or the result will sound more like, pardon the analogy, “farts” than a kick drum. In this case, since we need the beater’s impact on the head to be very present, we’ll set a fairly fast attack time. If we chose a slow attack, by the time the gate opens the transient would already be gone. That can be useful, for example, in a soft pop song where the recorded kick has too much attack.
So at this point we can say that we’re using the noise gate not only for its usual purpose—removing noise or bleed from other elements—but also to decide how much attack we want and how much of what comes after the attack we want to keep. In sections where the kicks are spaced far apart, we usually need to give a bit more prominence to the tail (without overdoing it) than in sections with fast, consecutive hits. Therefore, if the verse of that power metal song has very sparse kicks, we’ll probably want to set medium hold and release times. If we do otherwise, we’ll likely end up with a kick that sounds too sharp, thin, and lacking any real depth.
Now let’s configure the gate for the double-kick sections. Here, the hits are much closer together and usually at a slightly lower level than in the single-kick parts. The first thing we’ll need to automate is the threshold, lowering it until we see that the gate opens reliably on every hit. Next, we’ll adjust the attack time. In this section we probably want the maximum possible punch, so we’ll dial in the fastest attack that still sounds good to maximize impact. After that, we’ll fine-tune the hold and release times, adjusting them together until we find an optimal relationship. In these situations, I prefer to keep hold time as short as possible and use the release time to let a bit of tail through if needed. The key is to avoid strange artifacts caused by the gate’s action.
We’ve just seen a practical example of how we can use a gate not only to remove noise, but also to reshape the inherent dynamics of a sound so that it better fits our needs. As you can imagine, every track and every song requires its own treatment. The correct use of these devices (and of any other, for that matter) will depend on your technical skills, your musical taste, your experience, and your ears. As we said at the beginning of this series, mixing is the point where technical knowledge and artistic judgment come together.
At this stage we should also look at a type of distortion that can appear when using gates and expanders. Imagine we’ve set up a gate with extremely short attack and hold times and an extremely long release time. Once the signal falls below the threshold, the sound will fade out very slowly. Now imagine that this gate is inserted on a nylon-string guitar track in a rumba. Suppose that at the end of the song, instead of muting the strings, the guitarist lets the natural decay of the instrument ring out. Acoustic instruments almost never decay in a perfectly linear way; instead, their volume fluctuates as they fade. This is very evident in the kind of example we’re considering. Those fluctuations can cause the signal to momentarily jump above and below the threshold very quickly during the slow decay, creating a series of “drops” at the gate’s output.
When I see that a track could have this kind of issue, I prefer to act before it happens: I automate the gate so that it bypasses right at that section and then create a fade-out in Pro Tools’ edit window. If I only have a few tracks, I might risk waiting to see whether the problem appears, but in a 70–80 track mix, once those artifacts show up, you can waste a lot of time hunting down which track is causing them.
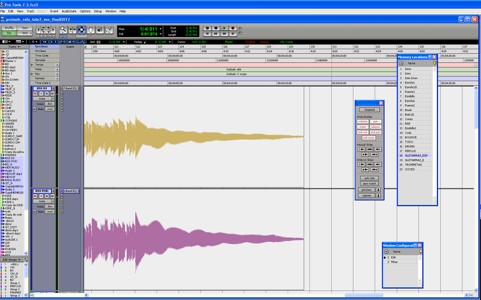 The image shows the tail of a bass signal that can present similar problems.
We can see the waveform fluctuating during its decay.
Expansion: Cleaning and Shaping Dynamics (II)
As we mentioned earlier, a noise gate is a very abrupt processor: it either lets the entire signal through or blocks it completely. When we use a lot of gates in a mix, the result can sound totally unnatural—the song stops sounding like a coherent whole and instead feels like a collection of isolated elements, with certain instruments exhibiting odd dynamic artifacts.
So we end up with two extremes: on one side, an unnatural sound filled with strange artifacts due to excessive gating; on the other, a hazy, muddy mix full of resonances and noise due to not using gates at all. So what should we do? Use gates? Risk going without them? Or look for a middle ground?
The most sensible answer is the third one, but we need to clarify what that means. The solution is not simply to use gates on some tracks and nothing on others, because as we’ve seen, gates are extremely powerful tools for reshaping dynamics. Our middle ground should come in the form of devices that behave somewhat like gates but with much more subtle results. These devices are downward expanders (in this series, unless otherwise specified, we’ll assume “expander” refers to a downward expander, i.e., one that acts when the key signal falls below the threshold).
There is some debate about where a gate stops being a gate and starts being an expander. By definition, an expander is a device that expands, just as a compressor compresses. The effect of an expander is the opposite of that of a compressor. Compressors, as we’ve seen, reduce the dynamic range of a signal; expanders increase it. Suppose we have a noise gate, but we don’t want 100% of the signal to be removed when the key falls below the threshold. Instead, we set it so that, when the signal is below threshold, it lets audio through with 25 dB of attenuation. In that case, we are effectively expanding the dynamic range of the signal: what used to be “quiet” is now 25 dB quieter, while the loud parts remain at the same level.
Imagine we have a gate with a threshold of –10 dBFS, and we feed it a continuous loop of two alternating pulses: one at –7 dBFS and another at –15 dBFS, separated by a small gap. At the output of a strict gate, we would only hear the louder pulse at –7 dBFS. If we now set the gate’s attenuation to 25 dB instead of full mute, the output will contain two pulses: one at –7 dBFS and the other at –40 dBFS, corresponding to the –15 dBFS pulse plus the 25 dB of attenuation. So we go from an input dynamic range of 8 dB to an output dynamic range of 33 dB. In other words, we have increased the dynamic range at the output by 25 dB.
 Graphical representation of how an expander works.
In the top graph we see the expander’s input signal, in the middle the output of a noise gate, and at the bottom the expander’s output. Notice how the dynamic range of the input signal is expanded in the expander’s output.
Graphical representation of how an expander works.
In the top graph we see the expander’s input signal, in the middle the output of a noise gate, and at the bottom the expander’s output. Notice how the dynamic range of the input signal is expanded in the expander’s output.
I consider this device to be an expander, even if it’s essentially just a gate with a defined amount of attenuation. The controversy I mentioned earlier comes, in my opinion, from whether or not the expander includes significant circuit-level changes. As we’ve said, an expander does the opposite of a compressor—but some people believe an expander must do *exactly* the opposite, while others (myself included) believe that as long as the dynamic range is being expanded, the device can conceptually be considered an expander.
This subtle difference has important implications, because a compressor includes something we haven’t discussed yet in this chapter: the ratio. Some argue that an expander must be different from a gate because its circuitry must include a ratio control, whereas others believe that as long as the device increases dynamic range, the classification is justified regardless of whether a traditional ratio is implemented.
I’m going to postpone explaining how a ratio-based expander works, because it’s much clearer to approach ratios for the first time using a compressor—most of you have already used compressors, so understanding ratios through them will be far more intuitive.
Returning to the topic at hand, we can now see that expansion is a subtler form of processing than gating, and it allows us to shape dynamics in ways very similar to noise gates, while also reducing undesirable noise rather than eliminating it completely.
Imagine you’re mixing a Latin fusion track or something similar, where the drummer plays very intricate snare patterns full of ghost notes, syncopations, and low-level details—not just loud backbeats. Using a noise gate here would likely result in the drummer sending you an envelope full of anthrax… and not without reason. A gate would chop off subtle hits, producing a choppy, unnatural snare track. In this case, an expander is a much better choice.
You’ll want to set the threshold and attenuation by watching the device’s meters and by relying on your ears. On complex tracks like this, automation is often essential, because a single static setting rarely works across all sections of the song. Attack, hold, and release times should be adjusted just as you would on a gate, depending on how you want to shape the dynamics.
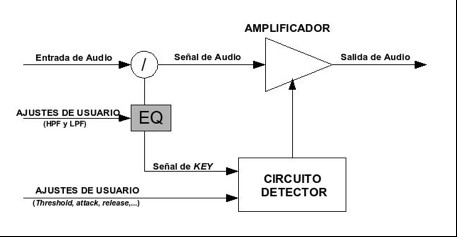
What is sidechain?
We’ve already seen how useful it is to EQ the key signal in a dynamics processor. Now imagine we could completely detach the key signal from the processor’s audio input—in other words, use *any* signal to control how the processor reduces gain, as shown in the diagram.
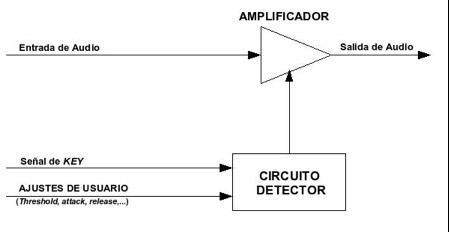 Dynamics processor configured with a sidechain.
This is what we call a sidechain. Any signal can serve as the key signal, determining how the processor reacts. This opens up an enormous range of creative and corrective possibilities.
One technique I often use is feeding the gate a key signal that is identical to the input audio but heavily EQ’d. I frequently mix demos recorded in home studios with poor acoustics, and drum tracks from those spaces can be quite problematic, especially due to strong room reflections. These reflections often reduce the dynamic contrast between the desired sound and the bleed from other elements.
For example, imagine a client sends you a demo where the snare track contains nearly the same level of snare as kick bleed. You try adjusting the gate’s built-in key filters, but even then the problem persists. The solution I often use is applying *extreme* EQ to the key signal.
Here’s the process:
- Duplicate the snare track.
- Solo the duplicate and insert an EQ with filters and at least one parametric band.
- Use the parametric band to sweep the frequencies and find where the snare has the most energy.
- Boost that frequency with a very low Q and remove everything else with high-pass and low-pass filters.
The result will sound completely absurd—but that doesn’t matter. This duplicate track now contains almost exclusively the snare’s strongest frequency. Route its output to a bus (let’s call it SN_Key) and leave its fader untouched from this point on.
Now return to the original snare track, insert a noise gate, and set its sidechain input to the SN_Key bus. The gate’s detector is now driven by a signal containing only the snare’s dominant frequency. The dynamic margin between snare hits and kick bleed becomes massive, allowing you to set the gate cleanly and precisely.
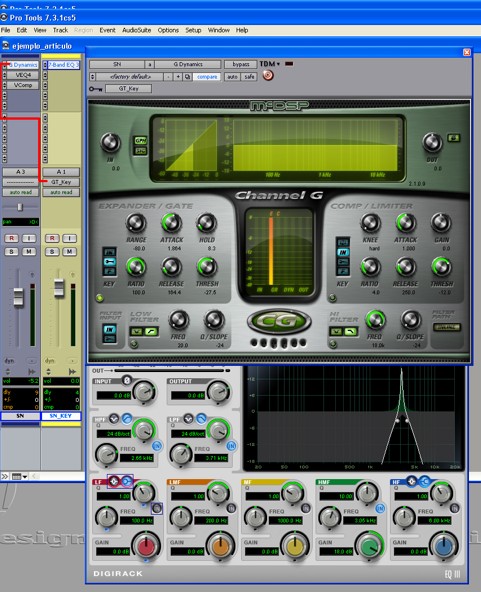 Example of gating using a duplicated, heavily EQ’d key track.
The gate on the original track is triggered by the output of the duplicated track.
Example of gating using a duplicated, heavily EQ’d key track.
The gate on the original track is triggered by the output of the duplicated track.
Don’t be afraid to use every tool and bit of knowledge you have—creatively—when solving mix problems. In the example above, we used an EQ in a completely unconventional way, not to shape tone but to isolate useful information. Mixing isn’t about hoping things magically sound good; it’s about thinking, experimenting, and using every trick available to achieve the result you want.
Let’s look at a practical example of the last technique. Not long ago I received multitracks from a punk band who had recorded in a very respectable studio. The tracks sounded great—especially the distorted guitars. They had exactly the right character for the genre: sharp and aggressive but never harsh.
However, in one of the heavier songs I couldn’t find a relationship between the guitars and the lead vocal that truly worked. If I left the guitars sounding the way I liked, I couldn’t get the vocal to sit well without applying way too much EQ, which made the voice harsh and unpleasant. But if I EQ’d the guitars so the vocal sounded right, then the guitars lost all their magic in the sections without vocals.
My first idea was to automate the EQ on the guitars so it would only change when vocals were present. It sort of worked, but I quickly realized I would need hours and hours of automation, because even within a single verse the guitars sounded weak in the gaps where the vocal wasn’t singing. On top of that, it was very obvious that something strange was happening to the guitars in the little pauses between phrases, so to make it flawless I would have needed an absurd amount of automation.
That’s when I tried to find a way for the EQ changes to happen automatically and only when vocals were actually present. Here’s what I did:
- I created two stereo aux/group tracks and routed the outputs of the rhythm guitars to both of them.
- On one of these aux tracks I inserted a phase inverter and an EQ.
- Inside that EQ I boosted the specific frequencies that clashed with the vocal, and I used high-pass and low-pass filters to remove everything else.
- After the EQ I inserted a noise gate with sidechain enabled, using the lead vocal track as the key input.
I then lowered the fader of that inverted aux track all the way down. From there, I slowly raised it until I found the sweet spot—where every time the vocal entered, the guitars stopped interfering with it, yet no strange artifacts appeared in the guitar tone. If you’ve followed the explanation up to this point but still don’t quite understand what I did, don’t worry. Let’s break down exactly what we accomplished.
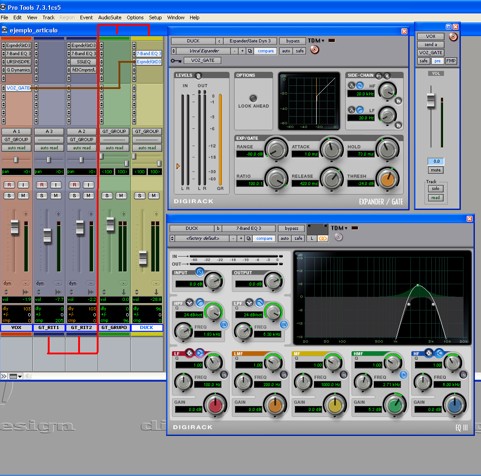 Diagram of the setup used to solve frequency masking between guitar and voice.
There is a phenomenon called coherent summation. If you take two identical signals and sum them, the result is the same signal but twice as loud. For example, if you duplicate a track and leave both faders at the same level, the combined result is simply a louder version of that track.
But what happens if you sum two identical signals that are 180º out of phase? They cancel out—completely. If you duplicate a track and flip the polarity on one of them, the instrument will vanish when both are played together. Now the trick should be becoming clear.
Remember what we did: we created an aux track receiving the guitars, inverted its phase, EQ’d it so that only the problem frequencies remained, and inserted a gate triggered by the vocal. This means that:
- Whenever there is no vocal, the gate stays closed → nothing is subtracted from the guitars.
- Whenever the vocal enters, the gate opens → the inverted, EQ-filtered guitar signal is added to the main guitars, cancelling out only the clashing frequencies.
The amount of cancellation is controlled by that aux track’s fader. The higher the fader, the stronger the subtraction. As a result:
- The guitars no longer mask the vocal.
- No weird coloration appears in the guitars.
- When the vocal stops, the guitars instantly return to their full tone.
This solved the problem perfectly without audible artifacts or endless automation.
Sidechain processing truly opens up an entire world of creative and corrective possibilities. As we’ve now seen in two examples—one simple and one more complex—sidechains can be used not only for dynamic control but also as powerful tools for shaping how different elements interact in the mix.
There are almost no limits to what you can achieve with thoughtful sidechain techniques. I often use “tricks” like these until I manage to get the musical result the track needs.
Author: José A. Medina (2008)